Showing posts with label WFMW. Show all posts

Wednesday, May 5, 2010

Oh Pasta, How I Love Thee!


wfmwbannerKRISTEN

Today is a backwards WFMW.  Instead of sharing our tips, we get to ask for help from other bloggers.  My questions are about making pasta.  Here is the background….

Last week, I decided to make some pasta.  I had made up my mind a while ago to start making my own pasta, but I hadn’t gotten around to making enough to store it in the pantry. 

After remembering the recipe for pasta incorrectly, I ended up making a TON of pasta.  (I thought it was 2 cups of flour to 1 egg, and it’s actually 2 eggs to 1 cup of flour)

Here is what my kitchen looked like….

DSC03199DSC03201

I really need a pasta drying rack!!

DSC03204

These little bits at the end made for a yummy pasta lunch (pasta with Prego.  You can’t get easier than that!)

After I was done making and hanging the pasta, Boozle and I went to the library for story time.  When we came back after a few errands, this is what I found…

DSC03206

The pasta had dried and started to break off onto the counters (and floor!).  It was quite a mess! If you just breathed, they broke into pieces.

 DSC03208 

In the end, I ended up with three big containers full of pasta.  The pasta is all different lengths, because they all broke at different points.  And, to get them to fit into the containers, I had to break them down even further.  It’s not very pretty! 

 DSC03209

Believe it or not, this will only last a few dinners.  We really love our pasta!

If anyone out there is a pasta expert, can you tell me how to keep it from being so brittle?  And how can I make it straighter? I’m not sure I have enough countertop space to lay it all out flat.  Do you have a better pasta recipe? 

Thanks for stopping by!  If you’d like to see if you can help out other bloggers with their questions, head on over to We Are THAT Family and see who has linked up today!

Wednesday, April 14, 2010

A Travel Cloth Diaper Bag

Last weekend we went to visit my in-laws for Easter.  They hadn’t seen Jack for a few months, and we wanted to visit my father-in-law’s church one last time before he retires.  We were staying for two nights and three days.  That’s not a very long vacation, but to a mama who uses cloth diapers, it is long enough to induce a mild panic attack.  I don’t have a travel size wet bag to keep my diapers in.  All I have is a big plastic diaper pail and a small tote that holds 3 or 4 diapers.  Three days is usually how many days we go before needing to wash the diapers, so I knew we’d be using more than just  a few diapers this weekend. 

Up to the last minute, I had planned to bring our big diaper pail, and just cart it home with us in the back of the van.  It would be inconvenient, but I couldn’t think of anything else.  Then, when we were almost walking out the door, I saw this insulated grocery bag hanging on the door handle.  I thought it just might be the perfect travel diaper bag!

 DSC03086 DSC03087

It’s insulated, so it shouldn’t leak if a diaper is too wet, and it has a zipper, so it should lock in the stink for the most part. 

I have to report that it worked GREAT!  I used one for the clean diapers and one for the used diapers.  The zipper did an excellent job of keeping the stink in, and there was no leaking at any time!  I did have to dunk some diapers in the toilet, which I usually don’t have to do, because we have a diaper sprayer, but overall, this was a pleasant travel experience with our diapers!  I don’t know if the bag is washable, so I just took a Clorox Wipe to the inside when we got home.  I’m not going to ever use this particular bag for groceries, but I may use it again for this purpose.

(My husband was happy I didn’t have to go buy a new bag!)

I’m linking this post up to What Works For Me Wednesday over at We Are THAT Family.  If you’re looking for other fun tips, check out her blog today and search through the tons of tips linked up by other bloggers!

Wednesday, October 28, 2009

See, I Can Be Creative!

I don't want to bore you with the "why" story of how I came up with this idea.  Let's just say that I saw a need, and I fixed it.  Have you ever seen the site "There I fixed it?"  I feel like I could submit this.  Maybe it's not that wacky, but it certainly made me think, "there, I fixed it!"


This is my grocery list*, held by a small binder clip, attached to a carabiner key chain, attached to a grocery cart.  I even cut a piece of cardboard to put behind the paper so it's easier to scratch off items from the list. 

Now that I have this 'contraption', my darling son won't eat my grocery list, and I can still put it down to continue my shopping.  (I'm experimenting with hanging the pen on the binder clip, but so far, the pen just goes in my pocket when it's not in use)

Go ahead.  Call me a nerd.  I deserve it*.

*I created my own grocery master list.  I even listed everything in the same order that my grocery store aisles are stocked.

Stop by We Are THAT Family to see what other nerds creative people are coming up with these days to make our lives a little easier.

Wednesday, October 21, 2009

That Darn Squeaky Door!!


There is nothing worse than getting my 9 month old son to sleep in his crib, only to have the squeaky door of his nursery wake him up when I'm trying to leave his room.  Sometimes, when Daddy comes in to check on him at night, he inadvertently wakes him up because of that darn squeaky door!

Yes, we have WD-40, and yes, I could walk it from the garage up to his room to fix this situation.  But when I think about needing it, I'm holding a baby-sleepy or sleeping-and can't go out searching the garage for this wonder oil.

So, the other night, I thought to myself, "What else would work?" I know PAM will work (as well as potato chip grease from your fingers-just sayin'), but I had the same problem as before. I'm upstairs when I think of it, and it's downstairs.

So what did I have upstairs with us when I needed it?  BABY OIL!! I put baby oil on some cotton balls and worked it into all of the hinges on the door. 


No more squeaky door waking up my sleeping baby! And no more waking Daddy when I come back to bed after being with Jack (because I used it on our door too!).  That's what works for me.  Stop on by We Are THAT Family to find more tips and what works for others.  Have a great day!

I also used it on my metal shower curtain rod to help the metal curtain hooks glide a little more smoothly.  It's not quite as loud either, which helps eliminate yet another 'wake-the-baby' sound.  

Wednesday, October 7, 2009

Random Cleaning Tips


This week has a theme!  We were asked to submit our cleaning tips this week.  Now, my family will laugh when I say I do have some cleaning tips, but really, I do!  I may not keep the cleanest house, but here are a few random tips I've used to make things just a little cleaner in my little world. 

Let me start by saying I use cloth diapers.  And because I use cloth diapers, I use flushable diaper liners.  They're what keeps me going in my cloth diaper endeavor!  Here is how I make dealing with a poopy cloth diaper just a little less messy  When I change my son's dirty diaper, I put the dirty liner in a little basket I keep by the changing station. After I put it in the basket, I use the antibacterial hand sanitizer on my hands.  When we're done with the diaper change, I say "let's go put your poopy in the potty!"   We walk to the bathroom and watch the poop go down the potty, sometimes saying "bye-bye poopies!" (meaning I say it, because my son is only 9 months old)  I have only had to touch the liner once, I've cleaned my hands quickly, and I didn't have to move his changing table to the bathroom!  (And just maybe I'm getting him used to the fact that poopy goes in the potty, so potty training will go quickly!) 


When I made this recipe for Chocolate Peanut Butter Cake Balls, I knew it was going to get messy.  I was going to have to mix crumbled cake with frosting.  Luckily, I knew my hubby had a box of disposable, vinyl gloves in the garage.  I grabbed some of those and mixed away.  Not only did it make the cleanup practically nothing (just throw the gloves in the trash), it made it kind of fun to play around in the cake-play-do-like mix.  By the way, I highly recommend making this recipe, but be prepared for a lot of mess and a divinely rich dessert. 


When we bought our new van over two years ago, it had that "new car smell" and it also looked spotless.  I loved it.  I don't know about you, but my cars have never stayed very clean for very long.  This time I thought I'd try harder to keep my new van clean.  I went to Wally-world and purchased a Dusting Microfiber cloth for around $2.  I keep it tucked in a bottom compartment in the van console, and pull it out every so often to dust my dashboard. Every once in a while, I throw it in the washer to get the dust and dirt off of it.  I've also used it to wipe the rain off my door when I have to open my window in the rain.  It has kept my dashboard clean for these 2+ years.  If only I could keep my cup holders clean too!


And finally, back to the cloth diapers.  I found this company when I was looking for cloth diaper tips that sold trial-run packages of cloth diapers.  They included a bunch of different brands of diapers in this package so you could "test drive" different brands before you spent all your money on them.  They send out a pack, let you try them for a few days/weeks, then you return the pack to them.   I loved that concept, but like some others who commented on their site, wondered how they kept the diapers clean.  It turns out that they strip them every time they get them back. So, I took this bit of wisdom, and strip my diapers every few weeks as well.  It really helps to get the stink out.  All you do is put your diapers in the washer with HOT water, dissolve some Oxi-Clean, let them sit in the water for a while (usually I let them sit for a half hour), then finish the wash cycle.  I also do an extra rinse on the days I strip them, just to make sure they're squeaky clean.  This has kept my diapers looking great, with very few stains.


Those are all of my random cleaning tips for this week's What Works For Me.  Stop by We Are THAT Family to see what other cleaning tips you can find. 

Wednesday, September 30, 2009

Adapting to a Tiny Freezer


My freezer is tiny.  It's the smallest side-by-side Frigidaire makes (I assume).  I can't even fit a frozen pizza in it!  So, when it comes to storing food in my freezer, I have to be creative with the space I have.

I like to buy my ground beef in bulk, because we go through it very quickly.  As soon as I get it home (or sometime in the next few days), I measure out 1lb servings of the meat and put them in freezer bags. (This is not the cool part yet)

The cool part is that I realized I could save space in my freezer AND help myself when it comes to defrosting my meat later.  When I put the pound of meat in the baggie, I squeeze out all the air.  I then mold the bag to form a flat meat 'pattie'.  The bags now take up only about 1/4 - 1/2 inch of vertical space.   I put those flattened bags in a gallon baggie to keep them all together in my freezer.  I can get up to 6lbs of ground beef in one gallon bag by flattening them out like this.


Not only does it save space in my freezer, but it also serves an equally important purpose.  I started out flattening them, because I wanted my meat to defrost quicker.  The thinner they are, the faster they defrost.  And as an added bonus, you don't have the frozen middle 'chunk' that you're too impatient to wait for, that freeze your hands when you try to form meatloaves or hamburgers. Or is that just me?

Flattening out my ground beef for freezing works for me!  Stop by We are THAT Family to find more tips and tricks that work for others.

Wednesday, September 16, 2009

Works For Me!


I don't know if I'm just out of the loop or what, but for the longest time, I didn't know what to do with my grease after browning ground beef. Growing up, I'm pretty sure we kept a can or jar in the refrigerator that we would add the grease to until it filled up. I presume it would then get thrown away. While that may work for some people, I found that with my space limitations in my fridge now (read "I have too much stuff packed into this tiny, tiny fridge), it just wasn't working for me to keep a jar of grease. I tried leaving it in the pantry, lazy susan, and even on the counter top. None of those worked for me either. I wanted to get rid of the grease, not save it. (before I met him, my husband would pour it into a coffee mug...later realizing he had to throw the mug away)

So, here is my solution. I create a little pocket/basket out of aluminum foil, place it in the bottom of the sink, and then drain my grease right into that. I let it sit in the sink while we eat dinner. Usually, by the time I'm ready to clean up after dinner, all I have to do is throw the aluminum foil into the trash can, because the grease has 'firmed up'. I love that I don't have to save my grease in the fridge, and that it's easy cleanup. It may not be as cost effective, but I'm finding that store brand foil is pretty cheap and it works just fine.


This is what works for me. I'd love to hear if you have a better tip for getting rid of your grease. I'm always open to new suggestions!

Find all sorts of tips and tricks and what works for others at We Are THAT Family.

Wednesday, September 2, 2009

Baby Food Organization

This is my What Works For Me Wednesday organization tip.

This organization tip isn't very exciting, but it definitely works for me.


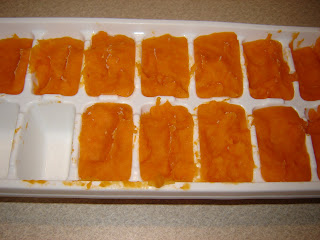
When Jack turned 6 months, I was excited to start making baby food. He didn't eat a lot at first of course, so I had a lot left over for freezing. I originally thought I'd purchase the fancy baby food cubes which stack nicely and keep things easy and clean while freezing your homemade baby food. But then I figured out that they're just glorified ice cube trays. In order to do anything I can to save us money, I decided not to buy the fancy cubes and just get a set of ice cube trays. I bake or steam the food, throw it in the blender to puree' it, and then freeze it in ice cube trays for a few hours or overnight. I then put the cubes in freezer bags and toss them in the freezer.


This was fine for a while, but then I had bags tossed all over my tiny freezer, and I was going crazy with the disorganized mess. (this may seem strange to those of you who know me, but I really hated not being organized with my baby food). In order to solve this mess, I knew I just needed a box of some sort. But I didn't want to purchase anything new (even though visions of cute little colorful sorting baskets came to mind). So, I found a box that was in my pantry, not in use, and tossed my bags in it. It was big enough to hold a few bags, and small enough to not take up a lot of freezer space. I can't close the lid, but that's ok for me. It adds vertical space to store my bags.


Check out what works for others and to get entered into some GIVEAWAYS at We Are THAT Family.

LinkWithin

Related Posts Plugin for WordPress, Blogger...