Showing posts with label organizing. Show all posts

Thursday, April 19, 2012

Getting My House Ready to Sell–Tips and Tricks

We have been on the market now for almost 3 weeks and we have had 6 showings.  After every showing, we receive feedback via email.  There is an 8 question multiple choice form the realtors fill out that gives us an indication of how the house showed, if the buyer is really a potential buyer, and if there is anything we can do to improve our home.  Every response has been excellent.  Our house shows perfectly –from curb appeal to cleanliness.  The only problem is the schools and the neighborhood.  Big inner city school system is not what most home buyers are looking for.  But we’re hopeful that the right buyer will come by and love our home and buy it up quickly.  We’ve been in the top three for 2 different showings, so I’m sure it won’t be too long now.  Fingers crossed.

In the meantime, I’d love to show you some of my little tips and tricks on how I keep my house show-ready or at least easy to get show-ready in no time at all. It’s things that I will keep doing whenever we move to our new home, since it leaves your home spotless and beautiful in just a few quick steps.  Who doesn’t want that?

Trash

No one wants to see your dirty trash when they look through your home.  I’ve come up with some quick tips for keeping our trash tamed.

P4190316

I have put all of my little trashcans from the bedrooms and bathrooms in the basement crawlspace.  I’ve always been bad at emptying those things on a regular basis anyway, so I got rid of them for showings.  Now, I just hang a Kroger bag over the handle.  When the showing comes, I take the bags with me and either throw them out in the outdoor trashcan or throw them in the van to bring back later.

My recycling days are on hold for now.  I used to hang a trash bag in my laundry room (which is right off of my kitchen) to hold our recycling trash.  We don’t have to sort our recyclables when we take them to the recycling dumpster.  Everything goes in the same dumpster, which makes it really easy on me.  But, now that I have to keep my rooms clean, I stopped recycling.  That’s one last bag I have to worry about grabbing before a showing, and one less hook I need to have on my laundry room wall.  I can’t wait to start recycling again. 

Laundry

No one wants to see your dirty laundry when they look through your home.

P4190318

On a regular basis, I keep two laundry baskets on my closet floor (one for darks and one for lights) and one in my son’s room.  On a showing day, I will grab those three baskets and put them in the back of my van.  I’ll then make sure to vacuum the floor where the baskets were to get the marks off the floor.

The other bit of laundry we have is towels.  On my master bathroom door, we have three hooks over the door with three towels hanging there.  I take those down (hooks and all) and plop them in a wicker hamper that is slightly hidden beside my dresser.  After the showing, I put them back up to make sure they don’t get mildewy

P4190319

This picture reminds me that I also run through the bedrooms and make sure all the dresser drawers are completely shut before we leave. I think I have a disease.  I leave dresser drawers open just a little all the time. 

Makeup and Bathroom supplies

No one wants to see your hairbrush, makeup, or shaving cream when they’re trying to picture themselves in your space.

I have a big problem with having too much STUFF.  One area where this is evident is my makeup and hair supplies.  Who knows why I need to have so much to choose from, especially since I use the same few items every day.  Getting my toiletries wrangled was probably my most rewarding cleaning/de-cluttering project in this whole house-selling adventure. 

P3300332P3300331P3300335

I now have a basket under each sink for my daily items and figured out a way to store the rest neatly.  I organized and de-cluttered my hair stuff (like bobby pins, ponytail holders and clips) and organized my machines (like flat iron, hair dryer and hot rollers)  Thanks Pinterest!

P3300328

My makeup was a bit trickier for me.  Included in my ‘makeup’ was my lotion, deodorant, and many makeup supplies.  They used to sit on my dresser, but after getting rid of some of my clothes (we donated a LOT last month) I ended up having a free drawer in my dresser.  I put my supplies in little baskets and they all fit neatly into that one drawer.  Now, I can take them out when I need them and hide them away when I’m done.  It makes me just a little giddy each time I hide my baskets away.  I really do love being organized.

Finishing Touches

I change out the bathroom and kitchen towels for ‘show towels’.  I bought two kitchen and three bathroom hand towels that look new and fluffy.  It cost me about $10 for all of them.  I put them under the sinks or in a cupboard in between showings, and my family knows they are not to use the new towels for their hands.  Ever.

P4010347

Before each showing, I make sure I have one or two nice bouquets of flowers in my kitchen.  I buy the $5 bouquet from Kroger.  These things last weeks if you take care of them.  I re-clip the ends after a few days and put them in fresh water.  I may crush up an aspirin someday too.  My mother says it keeps flowers living longer.

P4080435

One of my friends recommended baking some cookies before a showing so your house smells like freshly baked cookies.  I did that for the first showing, but now I find that it’s too much work for me to do that every time.  Instead, I leave out a bowl of candy.  So far it has been jelly beans (thanks Easter candy sales!)

I leave every single light on in my house (downstairs) when I leave for a showing.  I also open all the blinds and let as much light in as I possibly can.  Besides the obvious reason for leaving all the lights on (getting it as bright as I can in here), I have another reason for leaving the lights on.  All the lights in the living room are on a remote control switch, and I don’t want there to be any confusion trying to get the lights on when they come in the house.  

P3290319

Another reason I leave all the lights on is to show off my under-cabinet-lighting in my kitchen. If they don’t look, they might not know that it’s there. (oh, and we’ve fixed the dangling cord, so it doesn’t dangle anymore)P2270634

When everything has a place, cleaning up before a showing goes quickly and smoothly.  It doesn’t stay clean and spotless every day, but it can get clean and spotless in just a few hours (including mopping the floors) when a showing is scheduled. I just hope someone makes an offer soon.  I’m noticing the diligence with which I used to keep the place clean is starting to wear off.  If I go 4 days without a showing, it may take a bit longer to get it back into tip-top shape, but it’s still doable. 

What other tips do you have for keeping your house ‘show-ready’?  Do you live in a house that is always ‘show-ready’? 

Monday, March 12, 2012

Getting My House Ready to Sell–Toys

If you have at least one child in your house, chances are you have enough toys to entertain 10 children at one time. At least that’s how it is in our house. Let me show you some shameful before photos I dug up from my files to show you just how bad it is in our house when it comes to toys:

P1270001-1_thumb4

P2050114_thumb

There are a LOT of toys. Because we have so much space in the living room, we tend to fill it up with a lot of stuff. The biggest fear I had going into this house selling adventure was “what do we do with our toys!?” I couldn’t see how I was going to make it so that Jack could keep his toys, and we could stage this house for selling. Being at home all day, every day makes it impossible to keep a house clean. Toys are out as soon as the boy gets up in the morning. My challenge was to figure out a way to be a stay-at-home-family but not get the place messy.

In order to be ready to show our house in a moment’s notice, we consolidated, stored, and donated a LOT of toys. Here is what we were left with at the end of the day.

P2270646_thumb

I can grab this box with all the little boxes inside of it and easily take them to the basement crawl space or even to the back of the van when we leave the house. Jack knows where everything is, and he now knows that if he gets something out, the last toy’s he played with need to be returned. It doesn’t always happen like this, but it does help.

P2270648_thumb

We also have this ‘corner’ of the room with toys. It is also easily grab-able and stored in the basement at a moment’s notice.

P2270653_thumb

His big trucks have been parked in the room along various walls at different times, but I finally consolidated them into one ‘garage’. Having just redone our floors, our closet hasn’t yet gotten filled with random things, so I had the space to park the big machines in there. Jack thinks it’s fun to park them in their garage.

I’ve had to do some hard weeding out of toys. Jack loves trains. He loves his Geo Trax that he’s gotten from his cousins, but we decided to box them up and store them in the basement for now. I think they may make a few appearances before we move out of here, but they’re not out ALL.THE.TIME like they used to be. There are two other train/car tracks that are still out for him to play with, but they fit in smaller boxes, so they’re allowed to be up here.

I have to admit that baby toys take up MUCH MORE space than toddler toys. Matchbox cars and planes can be put in a small plastic bin. However, a bouncer, swing, baby gym and whatever this is called: DSC09380_thumbtake up much more space in a home. I’m not sure what I would have done if I had to deal with these toys in my home. (For now, they’re in our basement crawl space)

There are other things we’ve done in our living room to make it bigger, cleaner, and nicer, but those are not so much toy-focused as they are furniture removal. I’ll do a separate post on those whenever we finish staging our living room. Once the carpet is done upstairs (I’m typing this while the carpet guy is doing our carpet today), I’ll be able to get more ‘after’ photos from our rooms upstairs as well. We’re moving right along on this house selling adventure! Thanks for joining me on my journey.

Thursday, March 8, 2012

Getting My House Ready to Sell–The Kitchen

Well, Folks.  I’ve been absent again from blogging.  This time I have a VERY good excuse.  We’re getting our house ready to sell!  We haven’t liked where we are living for years, so this was a long time coming.  We can now move away from this house and neighborhood without fear of losing money in the deal.

There’s just one problem.  We I have a lot of junk.  I mean A LOT!  I’d like to blame Jack and all his toys, but really it’s all me.  It’s all stuff that I have acquired over the years and haven’t been able to let go of.  Really, do I need to keep the dozen Skintimate shaving gel samples I got 12 years ago from a school P.E. kit?  If I haven’t used them by now, I need to get rid of them!

Much of my cleaning out so far has been just that.  Getting stuff out of my house that has no purpose.  The Goodwill donation site guy is going to know me by name soon.  I went twice in one day, because I had so much stuff and couldn’t fit it in one load.  (and I drive a minivan, people!!)

While I’m cleaning out and making our house market-ready, I have learned a few tricks.  I thought I’d share them with you.  I can’t say yet if these tricks work for selling a house or are even any good, but I can say that they have made a huge difference in keeping my house clean so far.  (once you look past all the boxes of course)

Let’s start with the kitchen.  Here is a before picture of my kitchen.  Aye-yai-yai!!

P5190061

This picture actually came from last summer.  But fear not, this is how awful my kitchen looks on a daily basis.  When I have company, it looks a bit better than this, but there’s still a lot of stuff on my counters that I’ve had to deal with.  Let’s talk about what I’ve done so far.

Cutting boards – you can’t really see them in the before photo, but they’re back in the corner, on the counter, to the left of the Cuisinart.  I finally got those off my counters and into a cupboard above my (broken) microwave.  I had to clean out some stuff from that cupboard that I wasn’t using, but it freed up an entire cupboard for me to use.  My mom took the baker, and some pottery that hadn’t been used in 6 years.  (Sorry mom, since you bought some of those for me!)

P2270645

Recipe boxes – My pretty recipe boxes that were sitting on my counter to the left of the stove (the before picture was taken before I covered them with pretty paper) also got put up in that same cupboard above the microwave.

Tool caddy – I had two big/FULL kitchen tool caddy’s on my counters.  I use just about every gadget in those caddies too.  So instead of getting rid of it all, I put my most used tools in a drawer, left a few big spatulas and a whisk in the pretty crock, then loaded everything else that comes out every once in a while into a canvas ‘box’ that sits in my pantry.  It’s really inconvenient to have to dig through the box to find the can opener, but it makes my counters MUCH neater, so I can live with it until we move.  I put my unused tool caddy in storage.  I’ll be bringing it back out when we move!

P3080657

Food processer and Dutch oven – I am fortunate enough to own a BIG Cuisinart food processor and (since this Christmas) a HEAVY Dutch oven.  I love them both, and use them pretty regularly.  Up until this move, they’ve been sitting on the counter or stovetop full time.  I moved them both to my pots and pans cupboard after weeding out pans that I don’t use anymore.  (a big ‘spaghetti pot’ as we call it usually sits inside the Dutch oven, but it’s being used right now)

P3080656

baking canisters – I bake pretty often.  Well, maybe I should say I use baking ingredients (flour, sugar, brown sugar) often.  I make bread, desserts, and I use sugar in our oatmeal most mornings.  But they were ‘clutter’ on the counter, so I had to figure out a way to get them out of there.  I ended up putting them in the pantry.  It’s pretty convenient that we just redid our floors, and I had to clean out the pantry completely during that process.  My pantry was pretty organized when I started this kitchen clean up, so I had extra space to fill up in the big pantry. 

P3080661

Fridge - I have a lot of pictures on my fridge.  Every time I clean it off, I think I’m not going to clutter it up again,  but it always ends up cluttered.  This time I took off ALL the magnets and put them in a Ziplock bag to be brought out again once we move.  I also had to clean off the top of the fridge.  That happened when we redid our floors.  I had recently cleaned out all the medicine from the cupboard next to the stove (don’t they say NOT to put medicines next to the stove???) and put the container turn-about in there. 

P2270637

blog '11


Island organized – I have no pictures for now, but trust me when I say that I can make my island clear of clutter.  I have a mail center now that collets the mail, receipts, notepads, and random paper clutter.  It sits in the middle of the island and can be taken with us when we have showings. I just haven’t taken a picture of it yet.

So do you want to know what my kitchen looks like now?  Here is a (bad) photo of what it looks like when we’re on top of our game and ready to show. (I’ll have to do something with the loaf of bread, but for now, it stays there).  I purchased some “display” towels that will be hung when we go out for a showing. 

P2270635

Let’s see the dramatic before and after of this one again!

05 May 2011

I’m pretty proud of my cleaning and decluttering accomplishment.  This seemed like an insurmountable task!  I’m glad I have at least ONE room in my house ready to go!

As for the next posts on how I’m organizing other spaces in my house, I may be lacking with the ‘before’ pictures.  I’m not upset about that (since it means I don’t have to show you how BAD it all was), but it would have helped with the "wow factor” when you see how I’ve organized some other spaces. 

Until next time!

Tuesday, January 17, 2012

Time For My Bi-Annual Junk Drawer Cleaning

It’s amazing to me that I let something get so messy and leave it so messy for YEARS.  Who does that???  Almost two years ago I wrote a post about how I cleaned my junk drawer.  In that post, I mentioned how I had cleaned it out a few years before, but that it had gotten out of hand over time.  So, I have to assume that every two years I will clean out this junk drawer.  At least It gets cleaned.  Eventually.

Here is the before THIS time:

P1090214

I think I see the trays in there from last time I organized.

After cleaning everything out and throwing a lot away, here is the after photo:

P1090215

I think it’s even better than the after photo from last year time.  The two jars are what I love the most.  One jar holds twist ties and the other holds gumbands.  Raise your hand if you know what gumbands are!  (put your hand down, Mom.  I KNOW you do!)

I know you come here for riveting posts. Glad I could provide for you. 

Thursday, August 25, 2011

Recipe Boxes Prettified…sorta

Do you remember these? (click on the picture to see how I organized my recipes)

P5230008

I LOVE having my recipes organized. I knew that I would cover them someday, but I wanted to wait until I found just the right paper.  I found this at JoAnne’s the other day, and it was 50% off – LOVE! 

OLYMPUS DIGITAL CAMERA

Now, before you look too closely, I want to remind you that I’m not a paper crafter.  I’ve never done this before. I’m pretty sure that if you want to cover a box with paper and Mod Podge, you should use something other than scrapbook paper.  It’s pretty thick, and these boxes are pretty irregularly shaped.  (irregular meaning they’re not flat and prefect rectangles).  I have no clue how to do this correctly, but I covered each box with 2 different pages that I thought were kitchen appropriate.  To finish it up, I put a layer of Mod Podge on the entire box as a sealant.

OLYMPUS DIGITAL CAMERA

While they’ll never win any awards for being perfect or even beautiful, they’re much nicer to have in my kitchen than the plain gray boxes.  I hope they last for years to come, and that they don’t start peeling any time soon.

OLYMPUS DIGITAL CAMERA

Thursday, May 26, 2011

Delightfully Inspiring–Organized Recipes

(Today’s post will be linked up to Delightful Order.  Go see other inspiring posts at her site today!)

I have a lot of recipes.  I mean a LOT of recipes.  I have a bunch of cookbooks, and few years (maybe 8?) worth of Quick Cooking magazines (which, evidently they stopped making years ago), a ton of favorites saved online *oh wait!  No I don’t. I lost those when the computer crashed* and a full large index card box.  I also have my grandmother’s two small index card boxes that are packed with recipes that I’ve only gone through once or twice in the past 5 years.

I’ve tried a lot of different ways to organize my recipes.  I tried to organize them in a nice neat binder, but that took too much work for me.  At least the way I was doing it took too much work.  So, I have pretty much stuck with and like having a big index card box on my kitchen counter.  My problem is that I have too many recipes now and my box is ready to explode.  And I only have 5 dividers for all of my recipes and that, for some reason, drives me crazy!

I recently started going through my Quick Cooking magazines with scissors and glue stick in hand.  I want to get rid of the magazines for space issues, but I don’t want to lose any of the good recipes I know have to be in there. Every good recipe I find, I cut it out with it’s picture if it has one, and glue it to an index card.  It’s working great.  (I’m still not done with this process yet)

A few weekends back, on my Girls Trip, I brought along my exploding recipe box along with a second box (given to me by my teacher friend turned SAHM, Justy who just happened to have a baby last week), a packet of alphabet dividers, and some brightly colored labels.  I spent about an hour or so bringing out every.single.recipe that I have and laying them out on the table in neat little piles.  I then labeled and categorized  each pile, then put them back into the two boxes. 

P4300023

It was so much fun!  But I have to admit.  I was a little overwhelmed, so I had to have my good friend Heather sit by me and walk me through my categorizing process.  I got a little stuck with a few recipes.  She was so patient with me.  Every time I asked Heather what she thought about where a certain recipe should go, she’d say the same thing, “Where would you go to look for it when you want to cook it?" I can’t tell you how many times she said that line, but it helped each time.  I must have had a brain block or something going on.

P4300031

The end result was two beautifully organized recipe file boxes that now reside on my kitchen counter.  I used 25 out of my 26 dividers.  I mean business when I set out to divide (and conquer).  Maybe one day I’ll get really crafty and mod podge them so they’re all cutsie, but for now, they’re as plain as my kitchen walls and counters. So sad.

P5230008

I used the different colors to create 4 main categories and labeled the outside of my boxes with those colors so I would know which box held which recipes.

P5230010P5230011*It’s Desserts.  Not Pesserts*

You can all laugh at me now because of how crazy I am about organizing my recipes.  But I have to admit that having them color coded and organized makes me a little giddy.  I love that some areas of my life are neat and orderly.  Have you seen my junk drawer recently?? 

Friday, March 25, 2011

I Can Clean!

The other day I was going into my laundry room to start a load of laundry.  I love that it’s on the first floor, but I hate that it’s right off the kitchen and where everyone can see it if the door is left open.

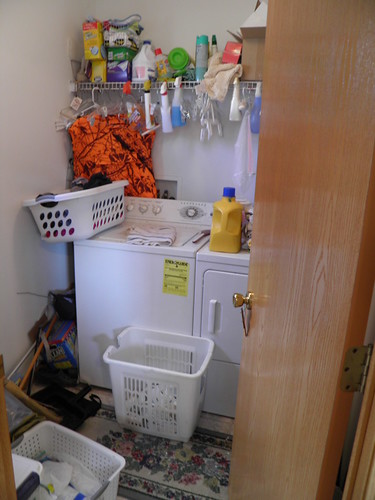
WARNING!!!  Here is a picture of what my laundry room looked like this day.  It was no worse than any other day before – that’s the problem.  It’s a MESS!!!!!!

P3020030

(The door is open as far as it will go because of *stuff* cluttered behind the door.)

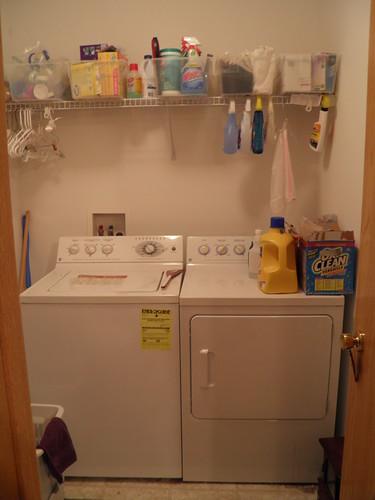
I was so annoyed with how cluttered it was that I couldn’t even do that load of laundry.  I spent the next hour or so organizing the mess.  I brought in a kitchen chair and went through all the stuff on the shelf – I had no idea what was up there!  I went through all the hangers and hunting gear and found a place for it all.  I sorted all the *crap* that was on the dryer keeping me from easily reaching the controls.

I went to Big Lots on a big sale day (everything in the store was 20% off) and bought some clear tubs. I cam aggravated because I can’t find my label maker anywhere, and I desperately want to label my tubs!  I can be such a nerd when it comes to labels.  I love them!

P3060093

So here it is, the organized laundry room.  I have a place for everything and everything is in its place! And can you see?  The door is completely open! Since this day, I’ve added hooks on the wall and started using ‘vertical space’.  I use this room for laundry, recycling, and extra pantry storage (just my 25lb container of flour). 

Maybe I’ll get really bright paper and put big colorful labels on the tub to make it cuter.  It’s pretty white in there, isn’t it?

Anyway, I just wanted to prove to my husband, mom, and family (and close friends) that I can actually clean.  I know how.  I just don’t like doing it.

Friday, March 26, 2010

What Does YOUR Kitchen Junk Drawer Look Like?

DSC02699

No one likes to admit what their junk drawer looks like.  I know I don’t!  The only redeeming thing about this photo is that you can tell that at one time, it  was organized.  I did take time a few years (yes, YEARS) ago to clean it out and organize it with cute little baskets.  But, time has wrecked it.  And I’m getting annoyed with it.  So I cleaned it!

I dumped out the contents all over my family room floor while Jack was napping.  I put everything in need little organized piles, so I knew what I was dealing with. 

DSC02701

Then Jack woke up.  It made organizing a little challenging, but we managed to get it done with minimal stress.

Let’s take a look at what we found, shall we?

A million and one bag clips (I thought I didn’t have), some post–its and a contact case: 

  DSC02702

Some wipes from restaurants that my husband feels the need to save and some guitar picks.  LOTS of guitar picks:

 DSC02705 

Someone gave me 30 packs of gum on my 30th birthday (almost 3 years ago) and, since I don’t chew gum often, I still have a LOT left.  And pens, pens and MORE pens!  I had no idea there were so many in this one drawer!!

DSC02706

But I’m happy to report that the drawer got organized, stuff got thrown away, other stuff got put away to their proper home,  and Boozle didn’t choke on any of the many small bolts and screws. 

Awwwww….I feel much better now.

DSC02707

(I hope you can tell a difference.  I can certainly FEEL a difference!)

Wednesday, September 2, 2009

Baby Food Organization

This is my What Works For Me Wednesday organization tip.

This organization tip isn't very exciting, but it definitely works for me.


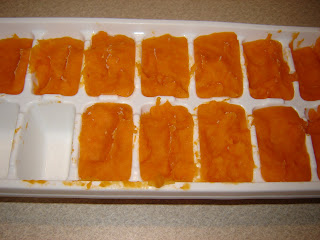
When Jack turned 6 months, I was excited to start making baby food. He didn't eat a lot at first of course, so I had a lot left over for freezing. I originally thought I'd purchase the fancy baby food cubes which stack nicely and keep things easy and clean while freezing your homemade baby food. But then I figured out that they're just glorified ice cube trays. In order to do anything I can to save us money, I decided not to buy the fancy cubes and just get a set of ice cube trays. I bake or steam the food, throw it in the blender to puree' it, and then freeze it in ice cube trays for a few hours or overnight. I then put the cubes in freezer bags and toss them in the freezer.


This was fine for a while, but then I had bags tossed all over my tiny freezer, and I was going crazy with the disorganized mess. (this may seem strange to those of you who know me, but I really hated not being organized with my baby food). In order to solve this mess, I knew I just needed a box of some sort. But I didn't want to purchase anything new (even though visions of cute little colorful sorting baskets came to mind). So, I found a box that was in my pantry, not in use, and tossed my bags in it. It was big enough to hold a few bags, and small enough to not take up a lot of freezer space. I can't close the lid, but that's ok for me. It adds vertical space to store my bags.


Check out what works for others and to get entered into some GIVEAWAYS at We Are THAT Family.

LinkWithin

Related Posts Plugin for WordPress, Blogger...